Plugin Installation Guide
Ting Reader supports extending functionality through plugins. By installing plugins, you can support more audio formats or fetch book metadata from more sources.
1. Prerequisites
Before installing plugins, make sure you have correctly configured the plugin directory mapping.
Docker Deployment Check
Check your docker-compose.yml file to make sure it includes a mapping for /app/plugins:
volumes:
  - ./plugins:/app/plugins  # 必须映射此目录
  - ./data:/app/data
  - ./storage:/app/storage
If this directory is not mapped, add the mapping and run docker-compose up -d to restart the container.
2. Download Plugins
Plugin packages are published by plugin authors or official release channels. Download the matching signed .tr package, then upload it in the admin area.
Plugin Types
General plugins (JS / WASM)
For example, ximalaya-scraper-js or ypshuo-scraper-wasm.
These plugins are generally OS-independent and can be used directly after download.
Native plugins
These plugins depend on the operating system and CPU architecture, so you must download the matching version.
Native Plugin Version Selection
| Filename identifier | Applicable environment |
|---|---|
| linux-x86_64 | General Linux servers, Synology/QNAP NAS (Intel/AMD CPU) |
| linux-aarch64 | Raspberry Pi, Synology/QNAP NAS (ARM CPU), Oracle Cloud ARM |
| windows-x86_64 | Windows desktop or server |
3. Install & Activate
- Download plugins
Download the required plugin files from the plugin author or official release channel as signed
.trpackages. - Upload & install
Log in to the Ting Reader admin area, then navigate to “Admin Dashboard” - “Plugin Management”.
Click the “Install Plugin” button in the top right corner and select the downloaded plugin file to upload.Tip: Ting Reader’s plugin system supports hot-swapping; plugins take effect immediately after installation, with no need to restart the container. - Verify status
After installation is complete, the new plugin will appear in the plugin list, and its status should show as Active.
- Configure plugins
If the plugin requires settings, click the gear button at the bottom of the installed plugin card to open the configuration panel.
4. Plugin Configuration
Go to “Admin Dashboard” - “Plugin Management”, then find the plugin you want to adjust in the installed plugin list. The bottom of the card shows actions such as repository, configuration, refresh, and delete.
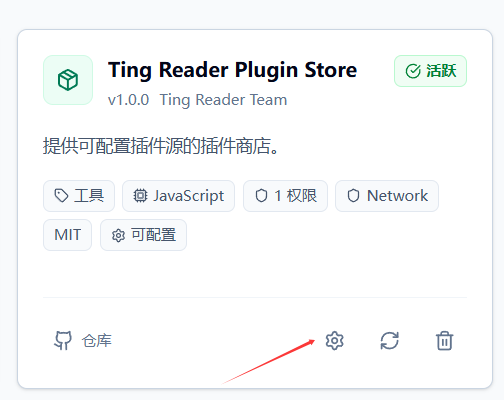
The gear icon marked by the arrow is the plugin configuration entry.
- Click the configuration button
Click the gear icon at the bottom of the plugin card to open that plugin's configuration panel.
- Fill in plugin settings
Follow the plugin instructions and fill in required values such as endpoint URLs, access tokens, enable switches, or custom options. Different plugins may show different fields.
- Save the configuration
After saving, the settings are written immediately. The plugin will use the new values the next time it performs scraping, parsing, or other tasks.